Procedure to use Aeropod as Powermeter by Claibration with DFPM?

Post Reply
quantus
Posts: 9
Joined: Sun Jan 27, 2019 6:55 am

Procedure to use Aeropod as Powermeter by Claibration with DFPM?

Post by quantus »

Dear here,

on my TT-Bike I have no Powermeter and want to used the Aeropod in Profile 1 as Powermeter. My CDA is around 0,225 instaed of 0,285 estimated.
I have installed a Powertap rear wheel to the TT-Bike for calibration rides. Aeropod is now well connected to the Powertap.

Which procedure would you propose to set up the Aeropod in Profile 1, that I can install my disc rear afterwards and have best fit in TT-Position? Currently Aeropod shows in Profile 1 w/o PT-Hub Power-Output of 380W on my 10 miles Test-Course but unfortunattely thats not true :))

Especially set up of Windscaling, Cm & Crr is not clear for me.

Any proposals?
Velocomp
Velocomp CEO
Posts: 7963
Joined: Fri Jan 11, 2008 8:43 am

Re: Procedure to use Aeropod as Powermeter by Claibration with DFPM?

Post by Velocomp »

quantus wrote: Wed Aug 13, 2025 8:58 am Dear here,

on my TT-Bike I have no Powermeter and want to used the Aeropod in Profile 1 as Powermeter. My CDA is around 0,225 instaed of 0,285 estimated.
I have installed a Powertap rear wheel to the TT-Bike for calibration rides. Aeropod is now well connected to the Powertap.

Which procedure would you propose to set up the Aeropod in Profile 1, that I can install my disc rear afterwards and have best fit in TT-Position? Currently Aeropod shows in Profile 1 w/o PT-Hub Power-Output of 380W on my 10 miles Test-Course but unfortunattely thats not true :))

Especially set up of Windscaling, Cm & Crr is not clear for me.

Any proposals?
Please post a .ibr ride file with both your AP and PT power data, and I will help you figure out things.
John Hamann
quantus
Posts: 9
Joined: Sun Jan 27, 2019 6:55 am

Re: Procedure to use Aeropod as Powermeter by Claibration with DFPM?

Post by quantus »

Oh great. I will send on friday.
quantus
Posts: 9
Joined: Sun Jan 27, 2019 6:55 am

Re: Procedure to use Aeropod as Powermeter by Claibration with DFPM?

Post by quantus »

Out and back TT ride
Attachments
iBike_08_15_2025_1511_12_km.ibr
(97.74 KiB) Downloaded 10 times
quantus
Posts: 9
Joined: Sun Jan 27, 2019 6:55 am

Re: Procedure to use Aeropod as Powermeter by Claibration with DFPM?

Post by quantus »

Hi, after a new calibration of an additional speedsensor garmin has shown me 2134 mm circumferance. That matches better to the 28mm conti gp 5000 tyre.
Velocomp
Velocomp CEO
Posts: 7963
Joined: Fri Jan 11, 2008 8:43 am

Re: Procedure to use Aeropod as Powermeter by Claibration with DFPM?

Post by Velocomp »

Here is the procedure I used with your profile 3 out-and-back ride file, using Velocomp Aero (VA)

1) I opened the file in VA, then used the command "File/Revert to Original Download..." to get the information as it was downloaded originally (it looks like there was an extra lap in the file you posted).

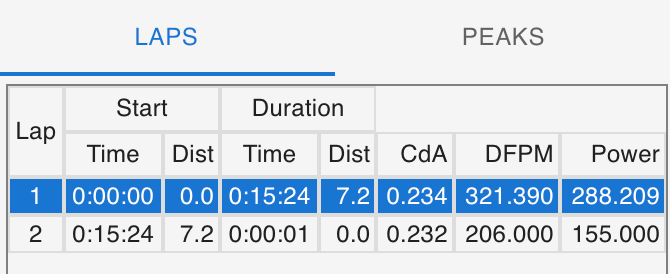
2) There are two laps shown: lap 1 is your O&B route. Note that in the Stats Window to the left of the graph, AP Power (Power) is 288W watts, while DFPM power is 321 watts. Note also that wind speed is lower than bike speed: when the wind sensor is calibrated, on an O&B route the "wind scaling balance" (WSB) should be 0.0, and wind speed should be very close to bike speed. The consequence of too-low wind speed and too-low default CdA is that AP is about 40W low, so we need to tweak the O&B for maximum accuracy, and likely update your default CdA value of 0.225
10.png
10.png (30.9 KiB) Viewed 40 times
18.png
18.png (131.76 KiB) Viewed 40 times
3) Click on lap 1 (your O&B lap); it turns solid blue. Note that in the lap 1 row, CdA is 0.234. This is the AP-measured CdA for the lap, not your default value of 0.225
11.png
11.png (33.5 KiB) Viewed 40 times
4) Place the pointer over lap 1; the lettering turns solid white
12.png
12.png (32.72 KiB) Viewed 40 times
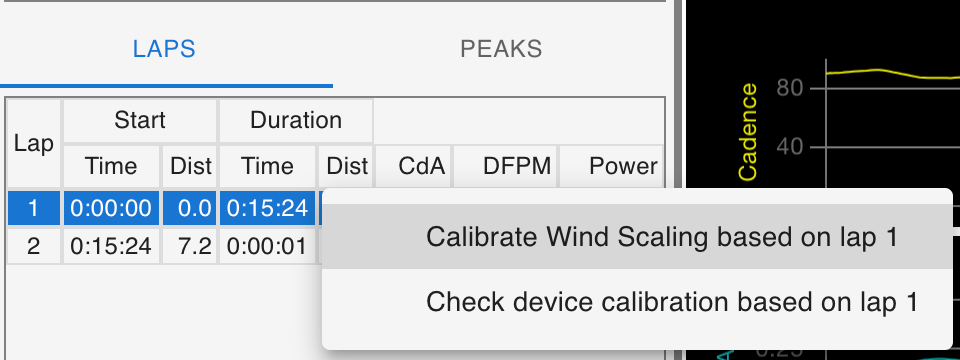
5) Right-click on lap 1; two options appear
13.png
13.png (55.83 KiB) Viewed 40 times
6) Place the pointer over the selection "check device calibration" and then click on the selection. A new window appears:
15.png
15.png (100.78 KiB) Viewed 40 times
7) Below the pointer graph, in the window "CdA to use", type 0.234, the value from the lap 1 result, then click Accept in the bottom right corner
23.png
23.png (107.2 KiB) Viewed 40 times
8) The corrected O&B result appears, and note that with CdA = 0.234 AP and DFPM watts now only about 0.5W apart!
21.png
21.png (134.23 KiB) Viewed 40 times
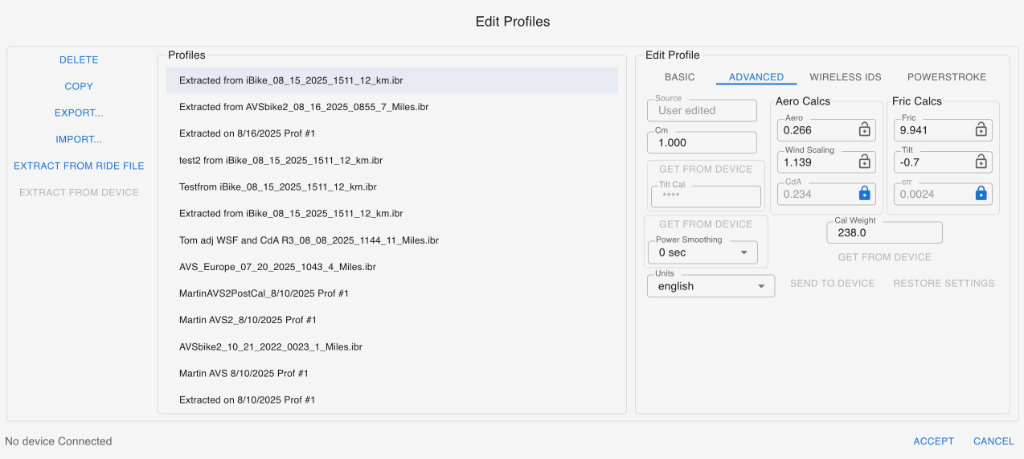
9) The final step is to update your AP with your adjusted parameters. Select "Edit/Edit Profiles..." and click on "Extract from Ride file"... Your corrected profile will be highlighted at the top, with the CdA 0.234 and updated wind scaling. Connect your AP to VA and then click on "Send to Device".
22.png
22.png (92.74 KiB) Viewed 40 times
------------------

Something I note from your ride file is that your Crr (rolling resistance) is very low, about 0.0024. This is a Crr value found in a velodrome. If that is where you did your ride then fine; if not please let me know where you did your ride and I will show you how to adjust things.
John Hamann
Post Reply